
Visual regression testing with Playwright
After using Playwright for a while I have finally landed on a setup that I feel does a pretty good job handling visual regression tests for components.
I figured I’d write it all down in case I need to do it again and also in case someone else out there would ever come looking for inspiration.
What is Playwright?
Playwright is a driver for Chromium, WebKit and Firefox and is most often used for in-browser automated integration testing or scraping. It solves the same problems Cypress, TestComplete and I'm sure several other tools do but in my opinion it's easier to set up and use.
This post will however not focus on integration tests at all, but rather on how Playwright can be leveraged to do visual regression testing. You absolutely should be doing in-browser testing because it can catch a whole lot of bugs that your unit tests will never detect but that's a topic for another day.
Most of the things we will cover in the rest of the post are specifically related to handling visual rendering and taking and comparing screenshots.
Who is this blog post for?
You might be wondering if you should be doing visual regression tests or not. You might even be wondering what it is.
The goal with visual regression tests is to ensure that one does not accidentally change or break the visual design of an application or a component library. Whenever CSS is involved it is easy to end up touching things you didn't expect to touch and visual tests will break and signal to you when that happens.
However they will also break on changes that were intended so these kind of tests should only be used for things that are expected to be relatively stable. Design systems and component libraries are excellent candidates but they can also be useful for applications that define their own components. You should not be using this for your online store's checkout flow but you could use it for your custom checkout-button.
What will the workflow look like with this setup?
Imagine you have created a custom checkbox component and you decided to make something fancy using borders and background colors. But then one day someone tells you about forced-colors and how a user who had enabled high contrast mode on Windows made a complaint about being unable to see if the checkbox is checked or not.
With a bit of googling you find a way to fix it so that the checked and unchecked state are visually distinguishable in forced-colors mode but then you realise that people very often forget to test that when they change something.
When you keep screenshots of your components and run tests against them you can both document what a component looks like, detect when that changes and even include a visual diff in the pull request itself.
Here's what a PR that fixes the forced-colors issue and adds a visual test for this component state might look like
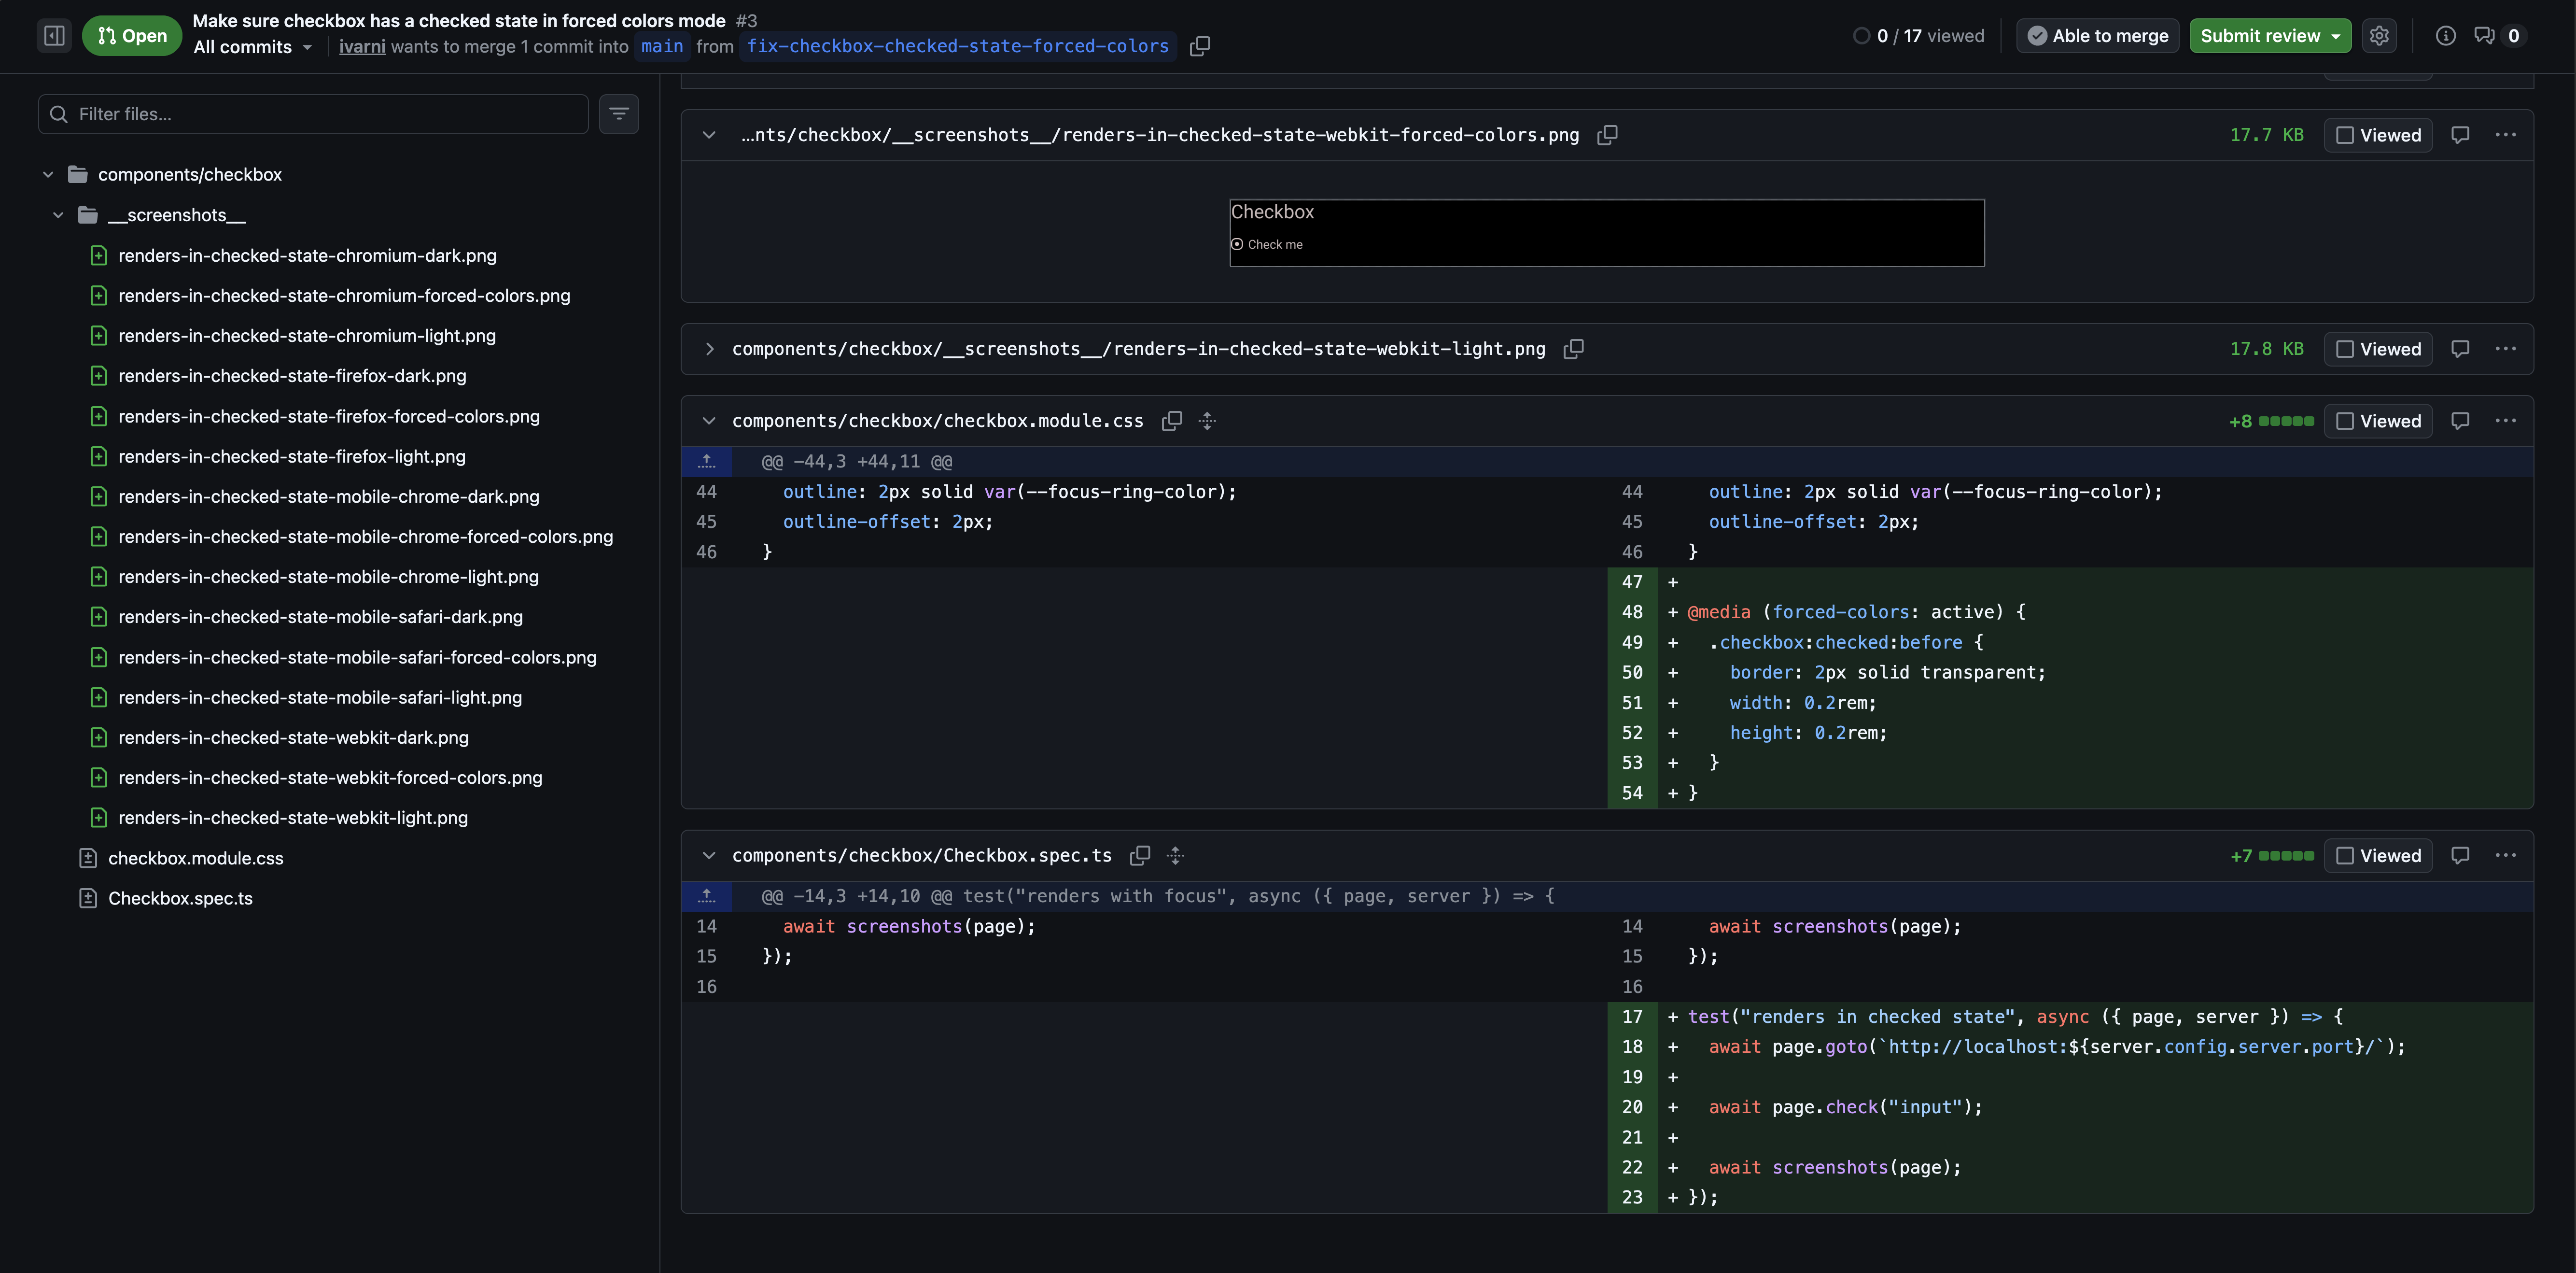
When you make an intended change to a component you simply recreate the saved screenshots and include that in the PR so reviewers can see what's actually changed.
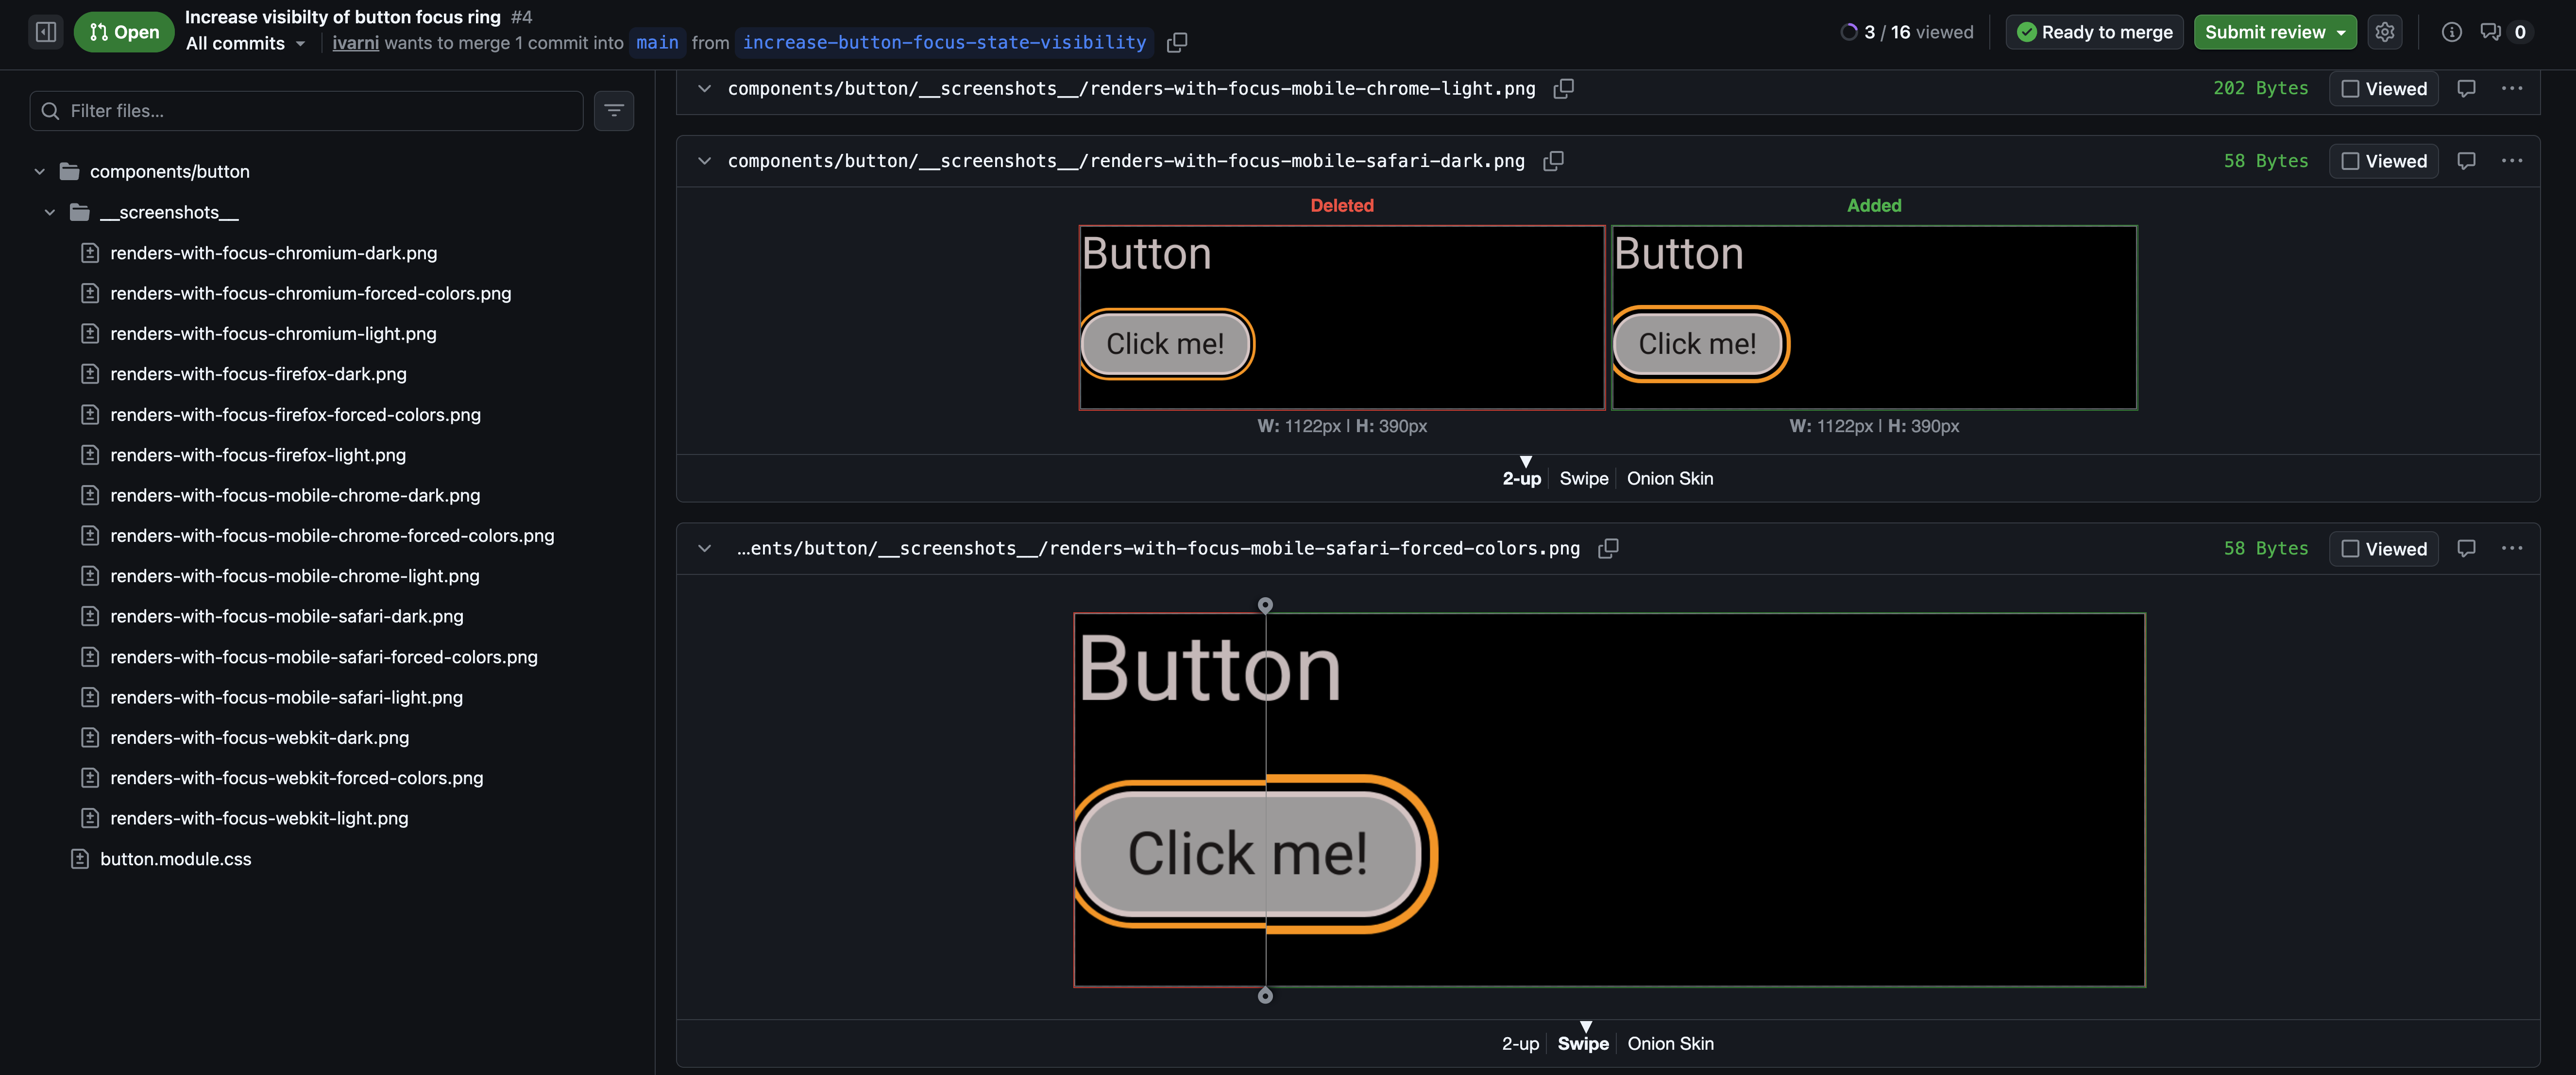
And if you accidentally change something the visual tests will fail because you didn't recreate the screenshots. No more accidentally breaking your UI.
Setting up a project
In order to have something to run tests on, I created a very simple component library. It’s only there to serve as an example and there are many steps that need taking to get to a state where it can actually be published and used by others. We won't cover that here.
What you might want to know for the sake of this walkthrough is that it consists of three components; a button, an input field and a checkbox. It has been set up with runnable dev-servers using vite and it is written in React.
The latter is not really relevant here, but I’ll come back to why I chose vite later.
The project structure looks like this:
There’s quite a bit of boilerplate with the vite setup. In a real-life project I would probably make a dev-script in the root folder and generate the files vite needs for each dev-server at runtime but for now this will do.
Each server can be started by running pnpm exec vite in the respective component
example-folders.
Adding Playwright to the mix
To quickly add Playwright to a project you can run pnpm create playwright or
find the equivalent command for your package manager of choice over at
their getting started guide.
The playwright.config.ts file I use looks like this:
import { defineConfig, devices } from "@playwright/test";

export default defineConfig({
  testMatch: "components/**/*.spec.ts",
  fullyParallel: true,
  forbidOnly: !!process.env.CI,
  retries: process.env.CI ? 2 : 0,
  workers: 1,
  reporter: [["html", { open: "never" }]],
  use: {
    trace: "on-first-retry",
    video: "on-first-retry",
  },
  snapshotPathTemplate: ".{/testFileDir}/__screenshots__/{testName}-{arg}.png",
  projects: [
    {
      name: "chromium",
      use: { ...devices["Desktop Chrome"] },
    },

    {
      name: "firefox",
      use: { ...devices["Desktop Firefox"] },
    },
    {
      name: "webkit",
      use: { ...devices["Desktop Safari"] },
    },
    {
      name: "Mobile Chrome",
      use: { ...devices["Pixel 5"] },
    },
    {
      name: "Mobile Safari",
      use: { ...devices["iPhone 12"] },
    },
  ],
});
I have opted to use testMatch with a glob pattern instead of keeping all my tests in a single folder. I like to co-locate my tests with my components. There’s nothing wrong with just using the default generated testDir property if you prefer to keep them in one place.
I also use a custom snapshotPathTemplate which will tell Playwright where to save screenshots. I’ve set workers to 1 because each test spins up its own Vite server and running multiple workers in parallel would require giving each server a unique cache directory to avoid conflicts. The rest of the file looks mostly like what Playwright will generate with the create-command.
If you ran pnpm create playwright then binaries for the browsers
Playwright uses will be installed already, if you didn’t then they can be
installed by running pnpm exec playwright install.
Writing the first test
Let’s start with adding a test to the button component. We’ll look at it first and then walk through it after.
import { expect, test as base } from "@playwright/test";
import react from "@vitejs/plugin-react";
import { resolve } from "node:path";
import { fileURLToPath } from "node:url";
import { createServer, ViteDevServer } from "vite";

const test = base.extend<{ server: ViteDevServer }>({
  server: async ({}, use) => {
    const server = await createServer({
      mode: "production",
      configFile: false,
      plugins: [react()],
      root: resolve(fileURLToPath(new URL(".", import.meta.url)), "example"),
    });
    await server.listen();
    await use(server);
  },
});

test.afterEach(async ({ server }) => {
  await server.close();
});

test("renders in default state", async ({ page, server }) => {
  await page.goto(`http://localhost:${server.config.server.port}/`);

  await expect(page.getByRole("button")).toBeVisible();
});
NOTE:
I have created the project as an ECMAScript Module by including
"type": "module" in my package.json file. If you are not able to do
that you will need to use __dirname instead of import.meta.url to
figure out the root of the Vite server.
There’s a couple of interesting things going on here. First we’re extending the base test object from Playwright in order to add a fixture for each test. We’re going to create a whole new dev-server for every single test. Tests don’t get more isolated than that!
Remember when I wrote that I chose to use vite? It’s got a pretty sweet API for spinning up a server and it’s so fast the French named a word after it. At the project I’m currently on we have a test-suite that runs on CI in about 2 minutes and I used the Performance API to measure that we spent in total about 2 seconds creating and starting servers. The catch here is that if running on multiple workers each instance of the Vite server needs to be given a unique cache directory with cacheDir. That is of course possible, but I haven’t seen any significant performance gains from doing it.
Vite will automatically find a free port to run and since we store the entire server object in the fixture the test can then use it to figure out what URL to visit. We can also ensure that we close the server after it’s done.
To run the test from the command line use pnpm exec playwright test from the
root folder or pnpm exec playwright test --ui for an interactive test-runner.
Taking screenshots
The objective was to create a visual regression test and simply checking if our button is on the page does not accomplish that. We need a more visual approach which means using Playwright to both record and compare screenshots.
I prefer my tests to take a screenshot and save it if one doesn’t exist or to fail if there is a screenshot but it doesn’t match the stored one. I couldn’t quite figure out how to make Playwright do just that with the built-in methods so I ended up creating a helper function for it.
const screenshot = async (page: Page, name: string) => {
  await page.evaluate(() => document.fonts.ready);

  const element = page.locator("[data-testid='example']");
  const box = await element.boundingBox();

  const screenshotRoot = `components/button/__screenshots__`;
  const testName = normalise(test.info().title);
  const projectName = normalise(test.info().project.name);
  const screenshotPath = `${screenshotRoot}/${testName}-${projectName}-${name}.png`;

  const hasScreenshot = existsSync(screenshotPath);

  if (hasScreenshot) {
    expect(
      await page.screenshot({
        animations: "disabled",
        caret: "hide",
        clip: { ...box! },
      })
    ).toMatchSnapshot(`${projectName}-${name}`);
  } else {
    await page.screenshot({
      animations: "disabled",
      caret: "hide",
      clip: { ...box! },
      path: screenshotPath,
    });
  }
};
What we’re doing here is first to make super-sure that all the fonts have
loaded. Then figure out what part of the screen should be in the screenshot.
All my component-examples are wrapped up in an element
with data-testid="example" so I know that I’ll find it on screen and
can create a bounding box from it.
Then it’s a matter of figuring out the full path and name of the screenshot based on which component is being tested, which test is running, the name of the Playwright project (that is which browser the test runs) and the name of the state that tested. I use the last part to identify things like light mode, dark mode and forced-colors mode and I make a second wrapper to run all screenshots through all of those.
const screenshots = async (page: Page) => {
  await page.emulateMedia({ colorScheme: "light" });
  await screenshot(page, "light");

  await page.emulateMedia({ colorScheme: "dark" });
  await screenshot(page, "dark");

  await page.emulateMedia({ forcedColors: "active" });
  await screenshot(page, "forced-colors");
};
The finalized button test then looks like this:
test("renders in default state", async ({ page, server }) => {
  await page.goto(`http://localhost:${server.config.server.port}/`);

  await expect(page.getByRole("button")).toBeVisible();

  await screenshots(page);
});
But leaving all that plumbing inside the button.spec.ts file will make
your team angry at you so let’s refactor.
I’ve pulled all the reusable stuff out to a utils folder. This is where the ugly code lives. As you’ve probably noticed by now a lot of this depends on the directory structure of the project. I’m completely fine with that because I don’t often change it but a lot of this would need to be changed to work in a different project.
If your directory structure is not unified you will most likely need to pass some paths to the helper functions or figure out a way to put it in a fixture.
import { test as base, expect, Locator, Page } from "@playwright/test";
import react from "@vitejs/plugin-react";
import { existsSync } from "node:fs";
import path, { resolve } from "node:path";
import { fileURLToPath } from "node:url";
import { createServer, ViteDevServer } from "vite";

const normalise = (name: string) => name.replaceAll(" ", "-").toLowerCase();

type BoundingBox = NonNullable<Awaited<ReturnType<Locator["boundingBox"]>>>;

function assertBox(box: BoundingBox | null): asserts box is BoundingBox {
  expect(box).not.toBeNull();
}

const getComponentNameFromPath = () => {
  const fileName = path.basename(test.info().file);
  return fileName.split(".")[0].toLowerCase();
};

export const test = base.extend<{ server: ViteDevServer }>({
  server: [
    async ({}, use) => {
      const server = await createServer({
        mode: "production",
        configFile: false,
        plugins: [react()],
        root: resolve(
          fileURLToPath(new URL(".", import.meta.url)),
          "..",
          "..",
          "components",
          getComponentNameFromPath(),
          "example"
        ),
      });

      await server.listen();
      await use(server);
    },
    { auto: true }, // start the server automatically without tests needing to declare `server`
  ],
});

test.afterEach(async ({ server }) => {
  await server.close();
});

const screenshot = async (page: Page, component: string, state: string) => {
  // Waits to make sure fonts are loaded
  await page.evaluate(() => document.fonts.ready);

  // Use the Playwright locator API to find the wrapper ComponentExample.tsx puts around the element being tested
  const element = page.locator("[data-testid='example']");

  // Calculate the bounding box and assert that it exists
  const box = await element.boundingBox();
  assertBox(box);

  const screenshotRoot = resolve(
    fileURLToPath(new URL(".", import.meta.url)),
    "..",
    "..",
    "components",
    component,
    "__screenshots__"
  );

  const testName = normalise(test.info().title);
  const projectName = normalise(test.info().project.name);
  const screenshotPath = `${screenshotRoot}/${testName}-${projectName}-${state}.png`;

  // Check if there already is a screenshot in the codebase
  const hasScreenshot = existsSync(screenshotPath);

  if (hasScreenshot) {
    // If there is one, assert that the rendered UI matches the saved one.
    expect(
      await page.screenshot({
        animations: "disabled",
        caret: "hide",
        clip: { ...box },
      })
    ).toMatchSnapshot(`${projectName}-${state}`);
  } else {
    // If there isn't one, create one.
    await page.screenshot({
      animations: "disabled",
      caret: "hide",
      clip: { ...box },
      path: screenshotPath,
    });
  }
};

export const screenshots = async (page: Page) => {
  const component = getComponentNameFromPath();

  await page.emulateMedia({ colorScheme: "light" });
  await screenshot(page, component, "light");

  await page.emulateMedia({ colorScheme: "dark" });
  await screenshot(page, component, "dark");

  await page.emulateMedia({ forcedColors: "active" });
  await screenshot(page, component, "forced-colors");
};
On the bright side, button.spec.ts is looking pretty sweet now and
writing tests for the rest of the components is fairly straightforward.
button.spec.ts
import { test, screenshots } from "../../utils/playwright/index.js";

test("renders in default state", async ({ page, server }) => {
  await page.goto(`http://localhost:${server.config.server.port}/`);

  await screenshots(page);
});

test("renders with focus", async ({ page, server }) => {
  await page.goto(`http://localhost:${server.config.server.port}/`);

  await page.focus("button");

  await screenshots(page);
});
checkbox.spec.ts
import { test, screenshots } from "../../utils/playwright/index.js";

test("renders in default state", async ({ page, server }) => {
  await page.goto(`http://localhost:${server.config.server.port}/`);

  await screenshots(page);
});

test("renders with focus", async ({ page, server }) => {
  await page.goto(`http://localhost:${server.config.server.port}/`);

  await page.focus("input");

  await screenshots(page);
});

test("renders in checked state", async ({ page, server }) => {
  await page.goto(`http://localhost:${server.config.server.port}/`);

  await page.check("input");

  await screenshots(page);
});
input.spec.ts
import { test, screenshots } from "../../utils/playwright/index.js";

test("renders in default state", async ({ page, server }) => {
  await page.goto(`http://localhost:${server.config.server.port}/`);

  await screenshots(page);
});

test("renders with focus", async ({ page, server }) => {
  await page.goto(`http://localhost:${server.config.server.port}/`);

  await page.focus("input");

  await screenshots(page);
});

test("renders in non-empty state", async ({ page, server }) => {
  await page.goto(`http://localhost:${server.config.server.port}/`);

  await page.fill("input", "I am not empty");

  await screenshots(page);
});
Running the tests on CI
Now we’re finally ready to run the tests on a continuous integration server. There is just one little and very important catch. Well there’s a couple actually but the first one has to do with rendering engines.
There are subtle differences between how different browsers on different operating systems renders things like fonts. You’re probably not going to notice the difference but believe me when I say that Playwright will.
It’s not practically possible to have the tests running on the CI server render our components exactly like they did on the developers machine.
There are two ways of handling this; either increase the tolerance level for difference in the Playwright config file using
expect: {
    toMatchSnapshot: {
      maxDiffPixelRatio: <some number here>
    }
  }
Or ensure that the tests always run in the exact same environment. Trying to find that exact pixel ratio that never has false positives while also actually catching regressions can be tricky. The better option is to containerise the test environment, which we’ll get to shortly.
Setting up a basic workflow
I am running this on Github, so the straight forward non optimised workflow file may look something like this (the full file is at playwright-basic.yml):
name: Playwright Tests
on:
  push:
    branches: [main]
  pull_request:
    branches: [main]
jobs:
  test:
    timeout-minutes: 60
    runs-on: ubuntu-latest
    steps:
      - uses: actions/checkout@v4
      - uses: pnpm/action-setup@v4
        with:
          version: latest
          run_install: true

      - name: Install Playwright Browsers
        run: pnpm exec playwright install --with-deps

      - name: Run Playwright tests
        run: pnpm exec playwright test

      - uses: actions/upload-artifact@v4
        if: ${{ !cancelled() }}
        with:
          name: playwright-report
          path: playwright-report/
          retention-days: 30
Running on docker
If you have more than one person working with the codebase chances are high that they will generate slightly different screenshots. That is not optimal, so we should ensure that everyone generates screenshots on the same runtime.
Luckily there already is an image we can use, mcr.microsoft.com/playwright:v1.60.0-noble.
To run this locally we create a small script
#!/bin/bash

npm i -g pnpm
pnpm i
pnpm exec playwright test
and run it using this command
docker run -v .:/test mcr.microsoft.com/playwright:v1.60.0-noble sh -c "cd test && ./run-test.sh"
What that does is mapping the current directory on the host (the root of our project) to a folder in the container and then opening that folder and running the tests to generate our screenshots.
Note that the container and host probably won't be able to share the same
node_modules folder so we need to purge and recreate that when we switch
environments. This can be handled with pre and post scripts or the tests
could run in a temporary folder and the screenshots copied over later.
The easiest solution is to just handle it with scripts.
"scripts": {
    "pretest": "rm -rf node_modules",
    "test": "docker run -v .:/test mcr.microsoft.com/playwright:v1.60.0-noble sh -c \"cd test && ./run-test.sh\"",
    "posttest": "rm -rf node_modules && pnpm i"
  },
Luckily pnpm is very fast so the overhead here is negligible.
On GitHub we need to tell our action to use this image by adding this above the “steps”
container:
  image: mcr.microsoft.com/playwright:v1.60.0-noble
  options: --user 1001
And then remove the pnpm exec playwright install --with-deps step,
as browsers are already installed in the precooked image. The complete
workflow at this stage is in playwright-with-docker.yml.
Speeding it up
When I set up this demo project the action took roughly 1m30s. None of these tests depend on each other so it’s a prime candidate for parallelisation.
In the workflow file, we add
strategy:
  fail-fast: false
  matrix:
    SHARD: [1, 2, 3]
    NUM_SHARDS: [3]
And then we update the test run command to use sharding
- name: Run Playwright tests
  run: pnpm exec playwright test --shard ${{ matrix.SHARD }}/${{ matrix.NUM_SHARDS }}
The final workflow with both Docker and sharding is in playwright.yml.
And now we have 3 jobs that run in a minute instead of the original 1m30s. That doesn’t sound like a very impressive speed-up (and it isn’t) but that stems from this repository having a relatively small number of tests and the overhead in the Github action step that initialises the containers dominates the time spent on a job
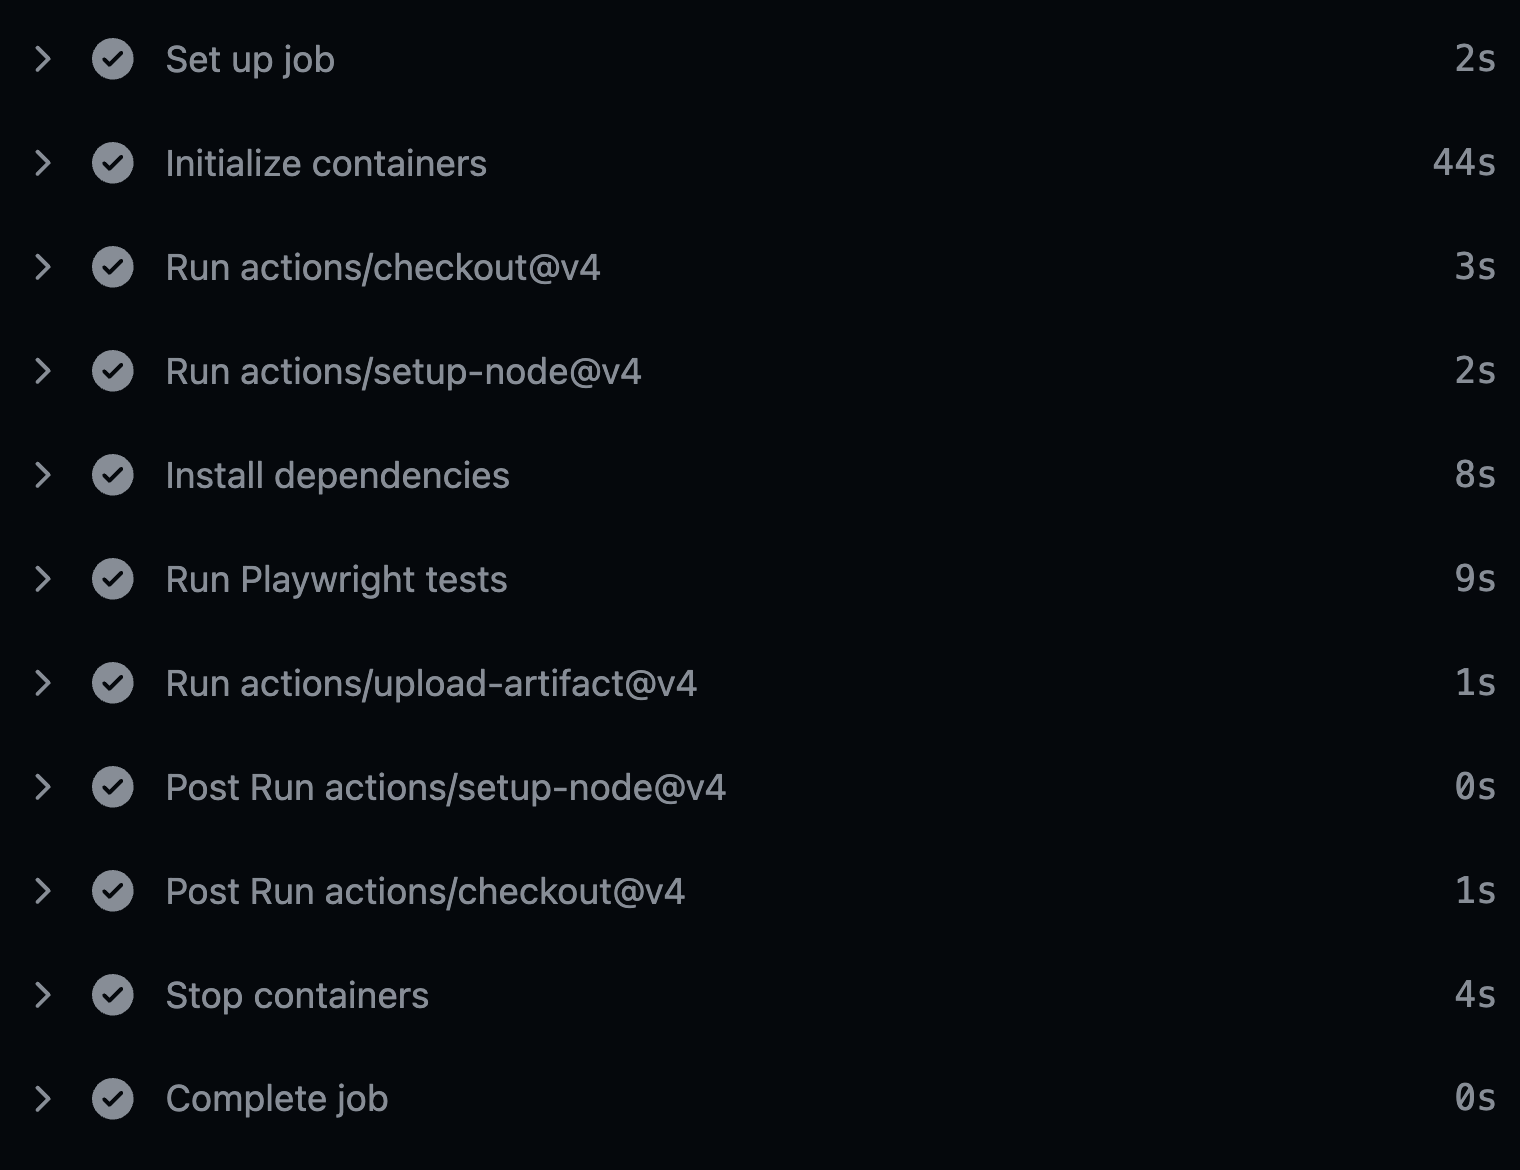
As the test suite grows in size the gains from using sharding become larger and it is not something I would normally do for a suite this small.
It is possible to address this by using self-hosted runners that already have the image cached locally. Doing that requires some infrastructure that must be managed and should not be done on public repositories as it can make it possible for forks to run malicious code on your server(s).
The code used in this post is available at https://github.com/ivarni/visual-regression-testing-with-playwright
